

BibleWorks on Apple Silicon & Retina Displays
Introduction
I've tried Logos. I've tried Accordance. Both are unfortunately not as good as BibleWorks (for me!) when it comes to original language texts and quick lexical reference, Logos and Accordance are still heavily focused on English translations (of which there are better applications for translations), therefore the value for what you get is worse.
I devised a solution for using BibleWorks on Apple Silicon-based computers (the official x86 macOS release isn't a native port so it's not worth considering or mentioning here, BibleWorks was only ever compiled as a Windows binary).
Some late 2024 fuel to the fire: the BibleWorks activation server (required by versions 9 & 10) is down for good. Any future reinstalls will now require a special work-around package that also has to annually be "refreshed". There are of course also 'other methods' that could be used if you purchased the software legally, but these will not be discussed here, sorry! A late 2025 update, the author of BibleWorks now has a manual system for activating BibleWorks which will continue until he's still around.
The BibleWorks author did make mention that some people are selling counterfeit pirated versions of the software on eBay, and I noticed this too. Well guess what? I had reported them a long time ago but eBay did nothing 🤣. Why would they? They have nothing to gain and only profit to lose.
Options for Running Windows (on Apple Silicon)
Your options to get a workable Windows instance on an Apple 'M series' computer are as follows:
- Purchase a license for Parallels and install Windows 10 on this with BibleWorks (Parallels is now largely subscription-only but you can purchase a one-time pro license as of 2024, but it will also not receive any updates and may cause problems in future versions of macOS)
- UTM cannot be used as it still does not support a bidirectional clipboard (as of 2024) for copying text out of BibleWorks and is generally very laggy. This could change if development eventually adds these features.
- Set up a cheap laptop or desktop and install Windows 10 on it with BibleWorks (or set up Linux as a Hypervisor to install Windows with VMware, QEMU, VirtualBox, Hyper-V...), which can be used with Microsoft RDP
- It may be possible to use something like Whisky or crossover, but I've not tested either and BibleWorks is extremely fickle with API translation (even on the Linux equivalent of WINE).
I'm going with #2 as I already have spare computers. This does have the added advantage of: 1) it doesn't take any resources out of your mac either so you save on RAM and CPU cycles, handy if you only have 16 GB on your Mac or even worse, one of the 8 GB models (which Apple should have never sold in my opinion), and 2) you can connect to this BibleWorks machine from any operating system to use it that supports RDP, including Linux.
This guide won't cover actually installing Windows on physical or virtual hardware, but once you do ensure that the power settings are adjusted so the computer won't go to sleep on you. If it's a laptop you're using (which is more economically friendly for power) ensure the power settings still allow the laptop's integrated display to turn off as it won't be needed.
Configuring RDP for macOS
Another late 2024 update: "Microsoft Remote Desktop" is now called "Microsoft Windows App", the process is the same but the screenshots are now out of date (I was rather quick to the ball game on RDP on Apple silicon macs). I'm not going to bother updating them as a result, but the UI is very similar.
Download Microsoft Remote Desktop (now called Microsoft Windows App) for macOS Apple Silicon either from the Apple store or the beta directly from Microsoft (if you're downloading the beta you'll want to drag it into the Applications folder after so it doesn't remain sitting in your downloads folder).
Click the plus sign and add a new PC. Under PC name add the IP address of the PC that will be connected to (you can get this info by typing "ipconfig" in Command Prompt and looking up what it says). All of the default options are fine except the following:

Colour quality can be bumped down to 16 bit if you're only doing textual work like I am. I've also disabled sound on mine, but you may still want sound if you're making usage of BibleWorks' audio features. Leave 'Optimise for Retina displays' unchecked! More on this later on.

'Clipboard mode' needs to be set as Bidirectional otherwise copying text out of BibleWorks won't make its way to macOS.
Ensure the PC with Windows 10 & BibleWorks has remote access enabled otherwise you won't be able to connect to it, you can enable this in the convoluted Windows Settings manager by searching for it:

Configuring BibleWorks for Retina Displays
Because Windows wasn't designed with UI scaling in mind and the option for DPI was kludged in as an afterthought decades later, most win32 binaries look horrible. Enabling high DPI upscaling (which is what the "Optimise for Retina displays" option does) can cause some Windows applications to use nearest-neighbour interpolation (BibleWorks does unfortunately) resulting in the exact opposite for clarity on a Retina Display while the rest of the operating system is properly scaled. You can rely on the linear mipmap filtering of the RDP window, but it looks worse. I'll show both options and corresponding fixes so you can decide how you want to proceed.
RDP's Linear Mipmap Mode
First we'll want to adjust ClearType to minimise the chromatic aberrations (search for the ClearType Text Tuner) in preparation for BibleWorks' internal scaling. Unfortunately Microsoft has also inextricably married font anti-aliasing and ClearType together, so if you want font anti-aliasing, ClearType has to be left enabled. Here are the five options I chose for optimal colourant mitigation, but feel free to choose whatever looks best to you.


Go into BibleWorks: View then Scaling, and choose a value higher than 100. I think 150 looks best (I'm using a 27" Studio Display although the DPI remains consistent across all Apple Retina Displays).

Then I have auto-hide enabled on the task bar so that BibleWorks always fills in the entire 'window' kind of making it look like a native app on macOS:

It's still inferior over real DPI scaling, but this results in something that's at least usable on a Retina Display. I'm not certain if Parallels also applies linear mipmap filtering when you forgo DPI upscaling by default, if it doesn't there's probably some way to do it -- or you could run it at a native resolution to fill whatever space you need at 100% scaling and then increase BibleWorks' internal scaling to something like 200 or 250. Sorry if all of this sounds complicated, but that blame can be placed on Microsoft for poor design.
RDP True-Retina Optimised with Manual DPI Work-Arounds
Now we have the option to use the "Retina Optimised" option of RDP; which really just keeps the native pixel scaling (which is what we want) and then bumps up the internal DPI (which is what we don't want). First go back to settings and the "display" table and enable "Optimise for Retina displays".
To combat the automatic DPI scaling (which is not compatible with both older Windows applications and even menus and interfaces within Windows itself 🤣) we'll need to run this registry script to override the DPI behaviour. Open Notepad, paste this text in, then under "Save as type" choose All files, then name it dpi.reg (or whatever name you want, as long as it ends in .reg). Run the file that you just saved and restart Windows. You must restart it because they did not program it to handle interface changes gracefully in realtime.
Windows Registry Editor Version 5.00
[HKEY_LOCAL_MACHINE\SYSTEM\CurrentControlSet\Control\Terminal Server\WinStations]
"IgnoreClientDesktopScaleFactor"=dword:00000001
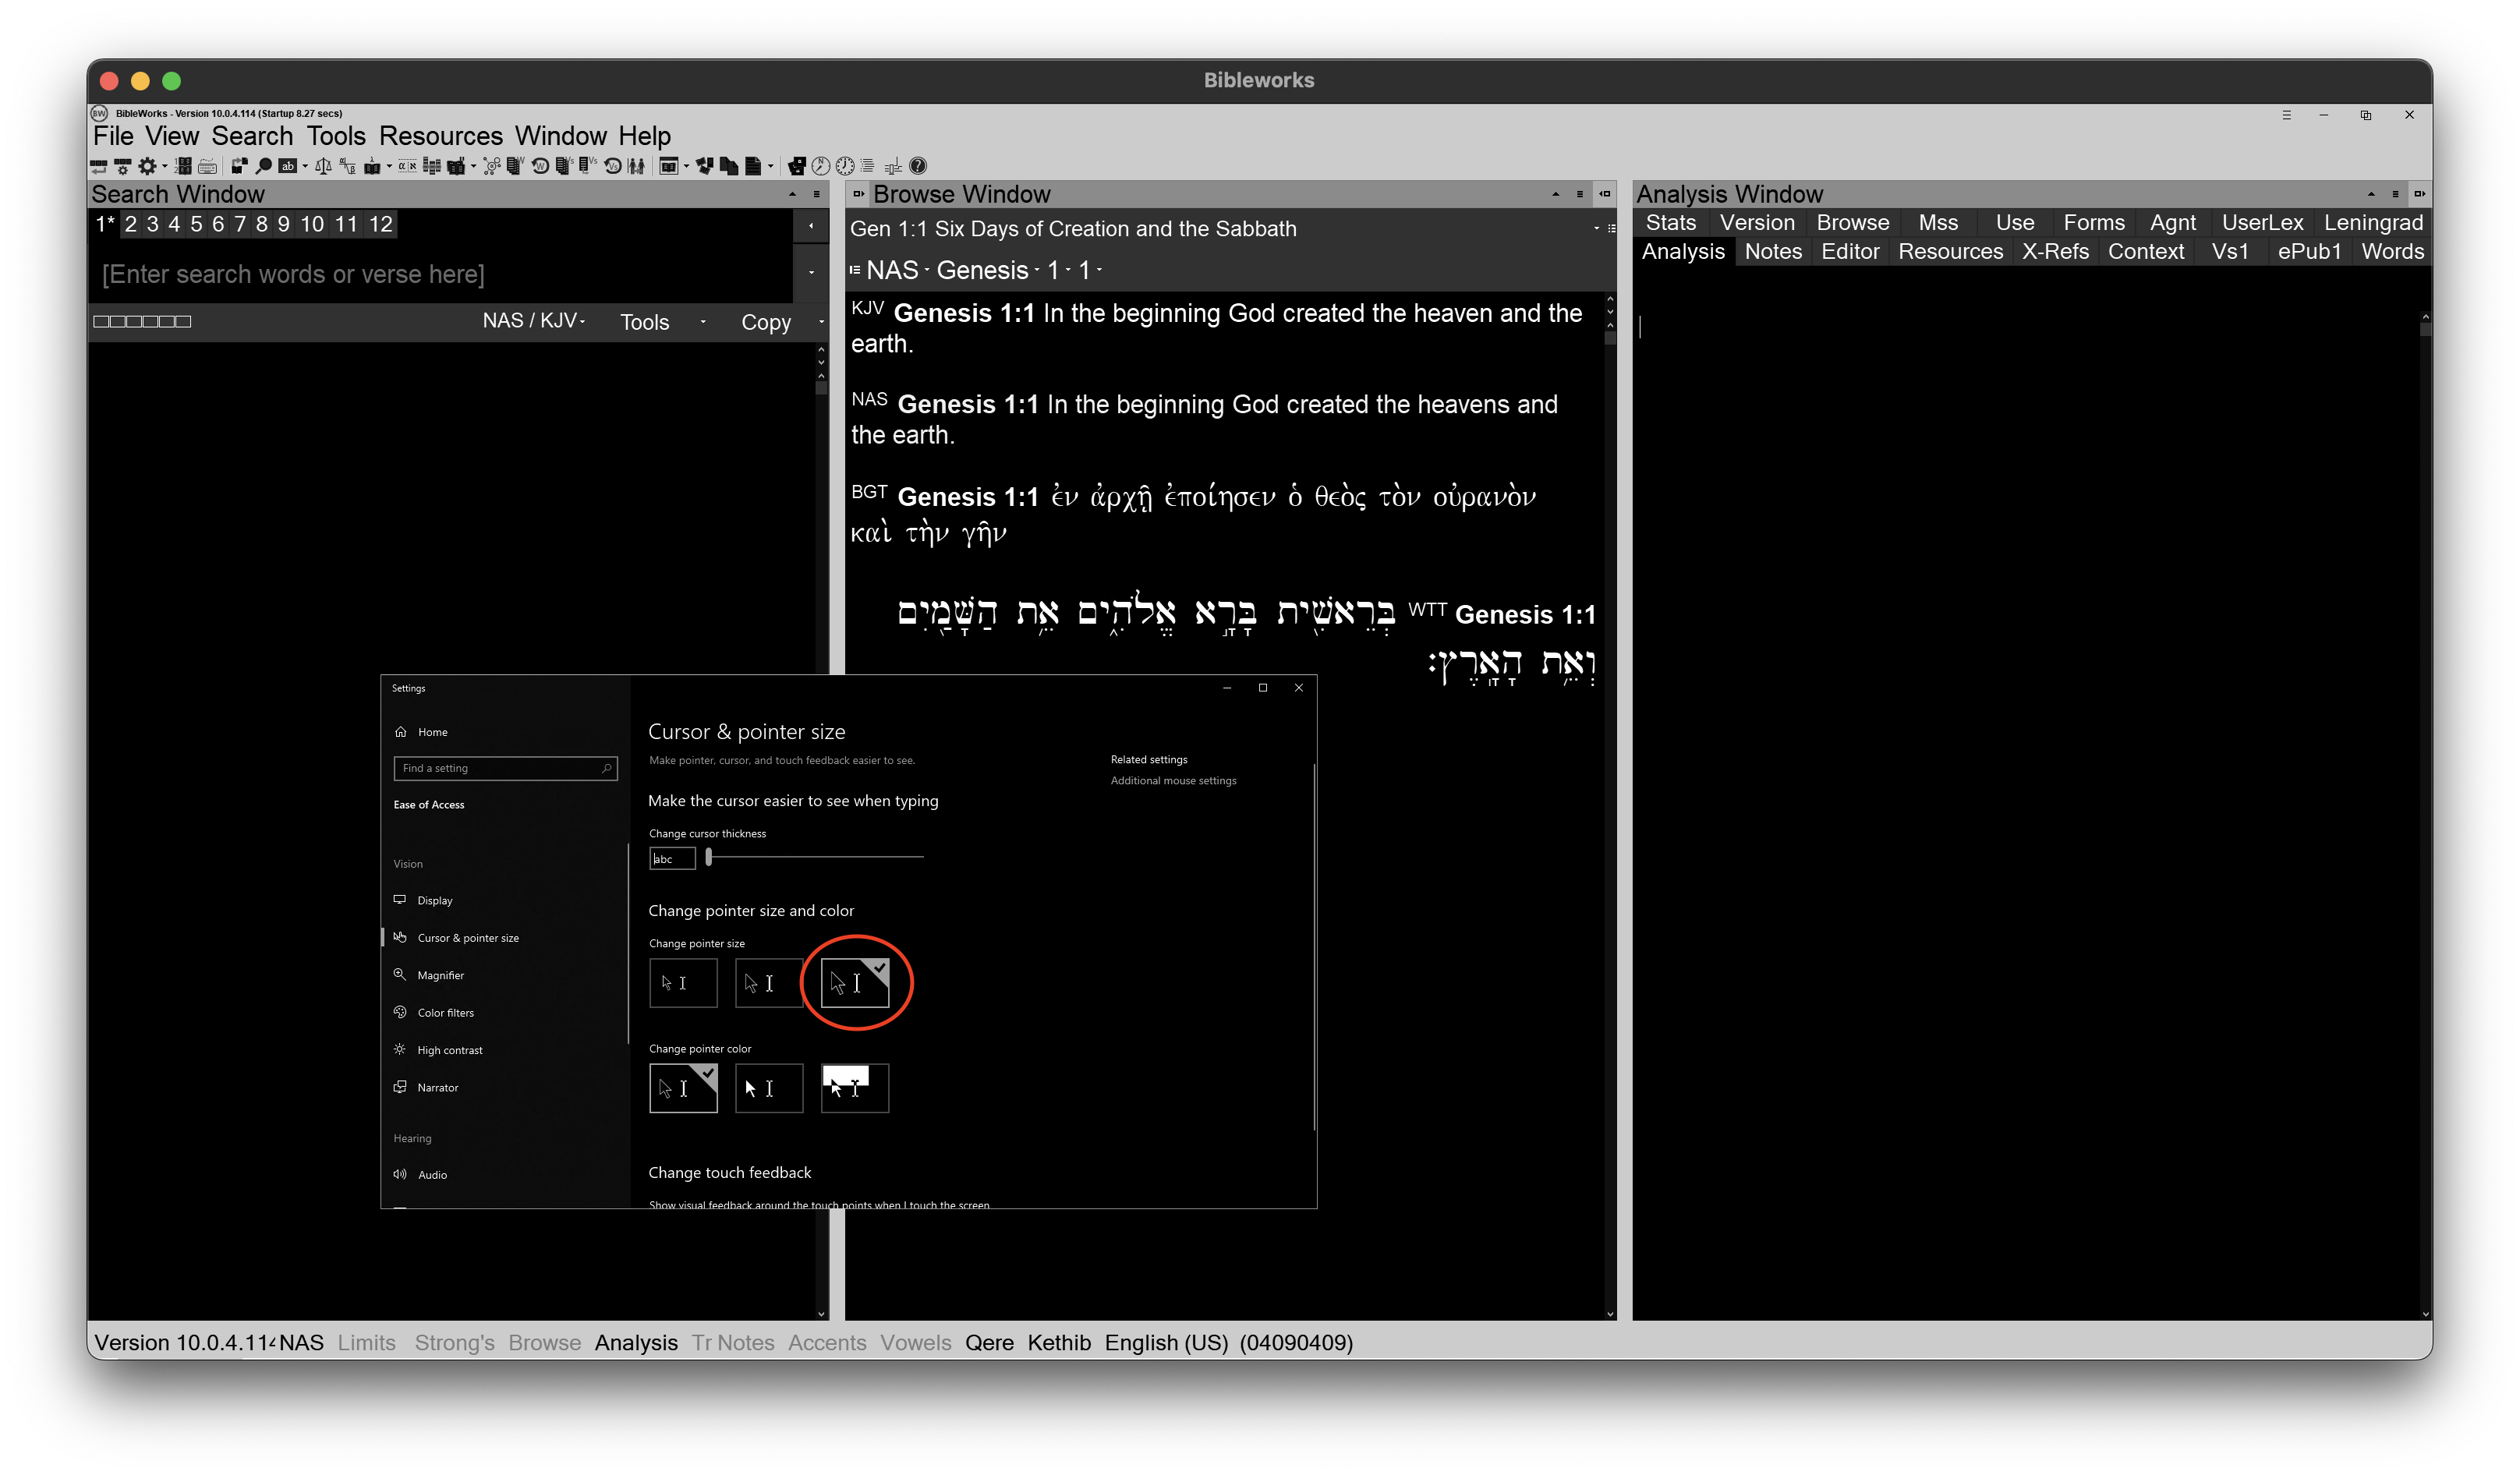
Finally setting up the scaling options in BibleWorks once again, View then Scaling. This time because the difference is much greater than when using RDP's Linear Mipmap Mode, in my case a very high value of 260 is needed. You'll also need to adjust the Windows cursor as it will most likely be too small, go to "Cursor & pointer size" options and choose the largest one. You'll now have an actual Retina experience. The one drawback to this is that the BibleWorks icons will remain small unfortunately as they're hardcoded bitmaps, no way to fix this.
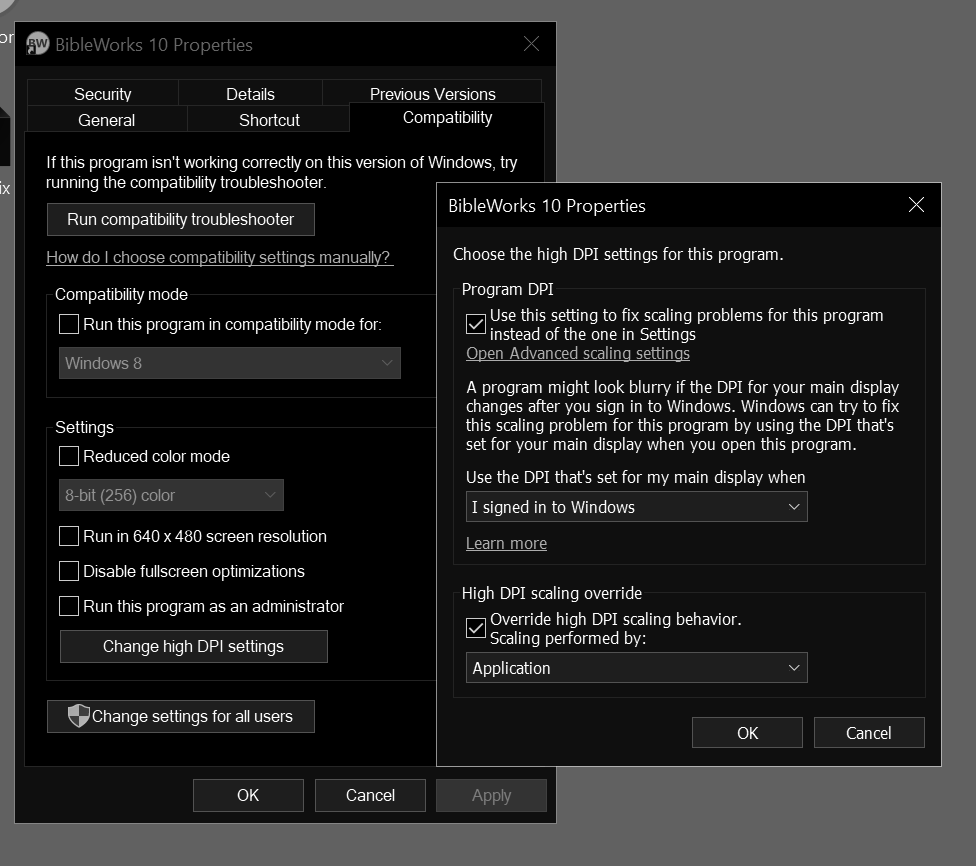
Upon a new install of Windows, for some reason Windows 10 (1809) was still running BibleWorks at 2x scaling with blurring even after running the aforementioned regedit. I had to check these two boxes off (the first under "Program DPI", and the second under "High DPI scaling override"):
Faking "Dark Mode" On BibleWorks 10
For whatever reason, the later versions of BibleWorks including version 10, have regressed and you can no longer change the background colour from anything other than white which is both annoying and unfortunate.
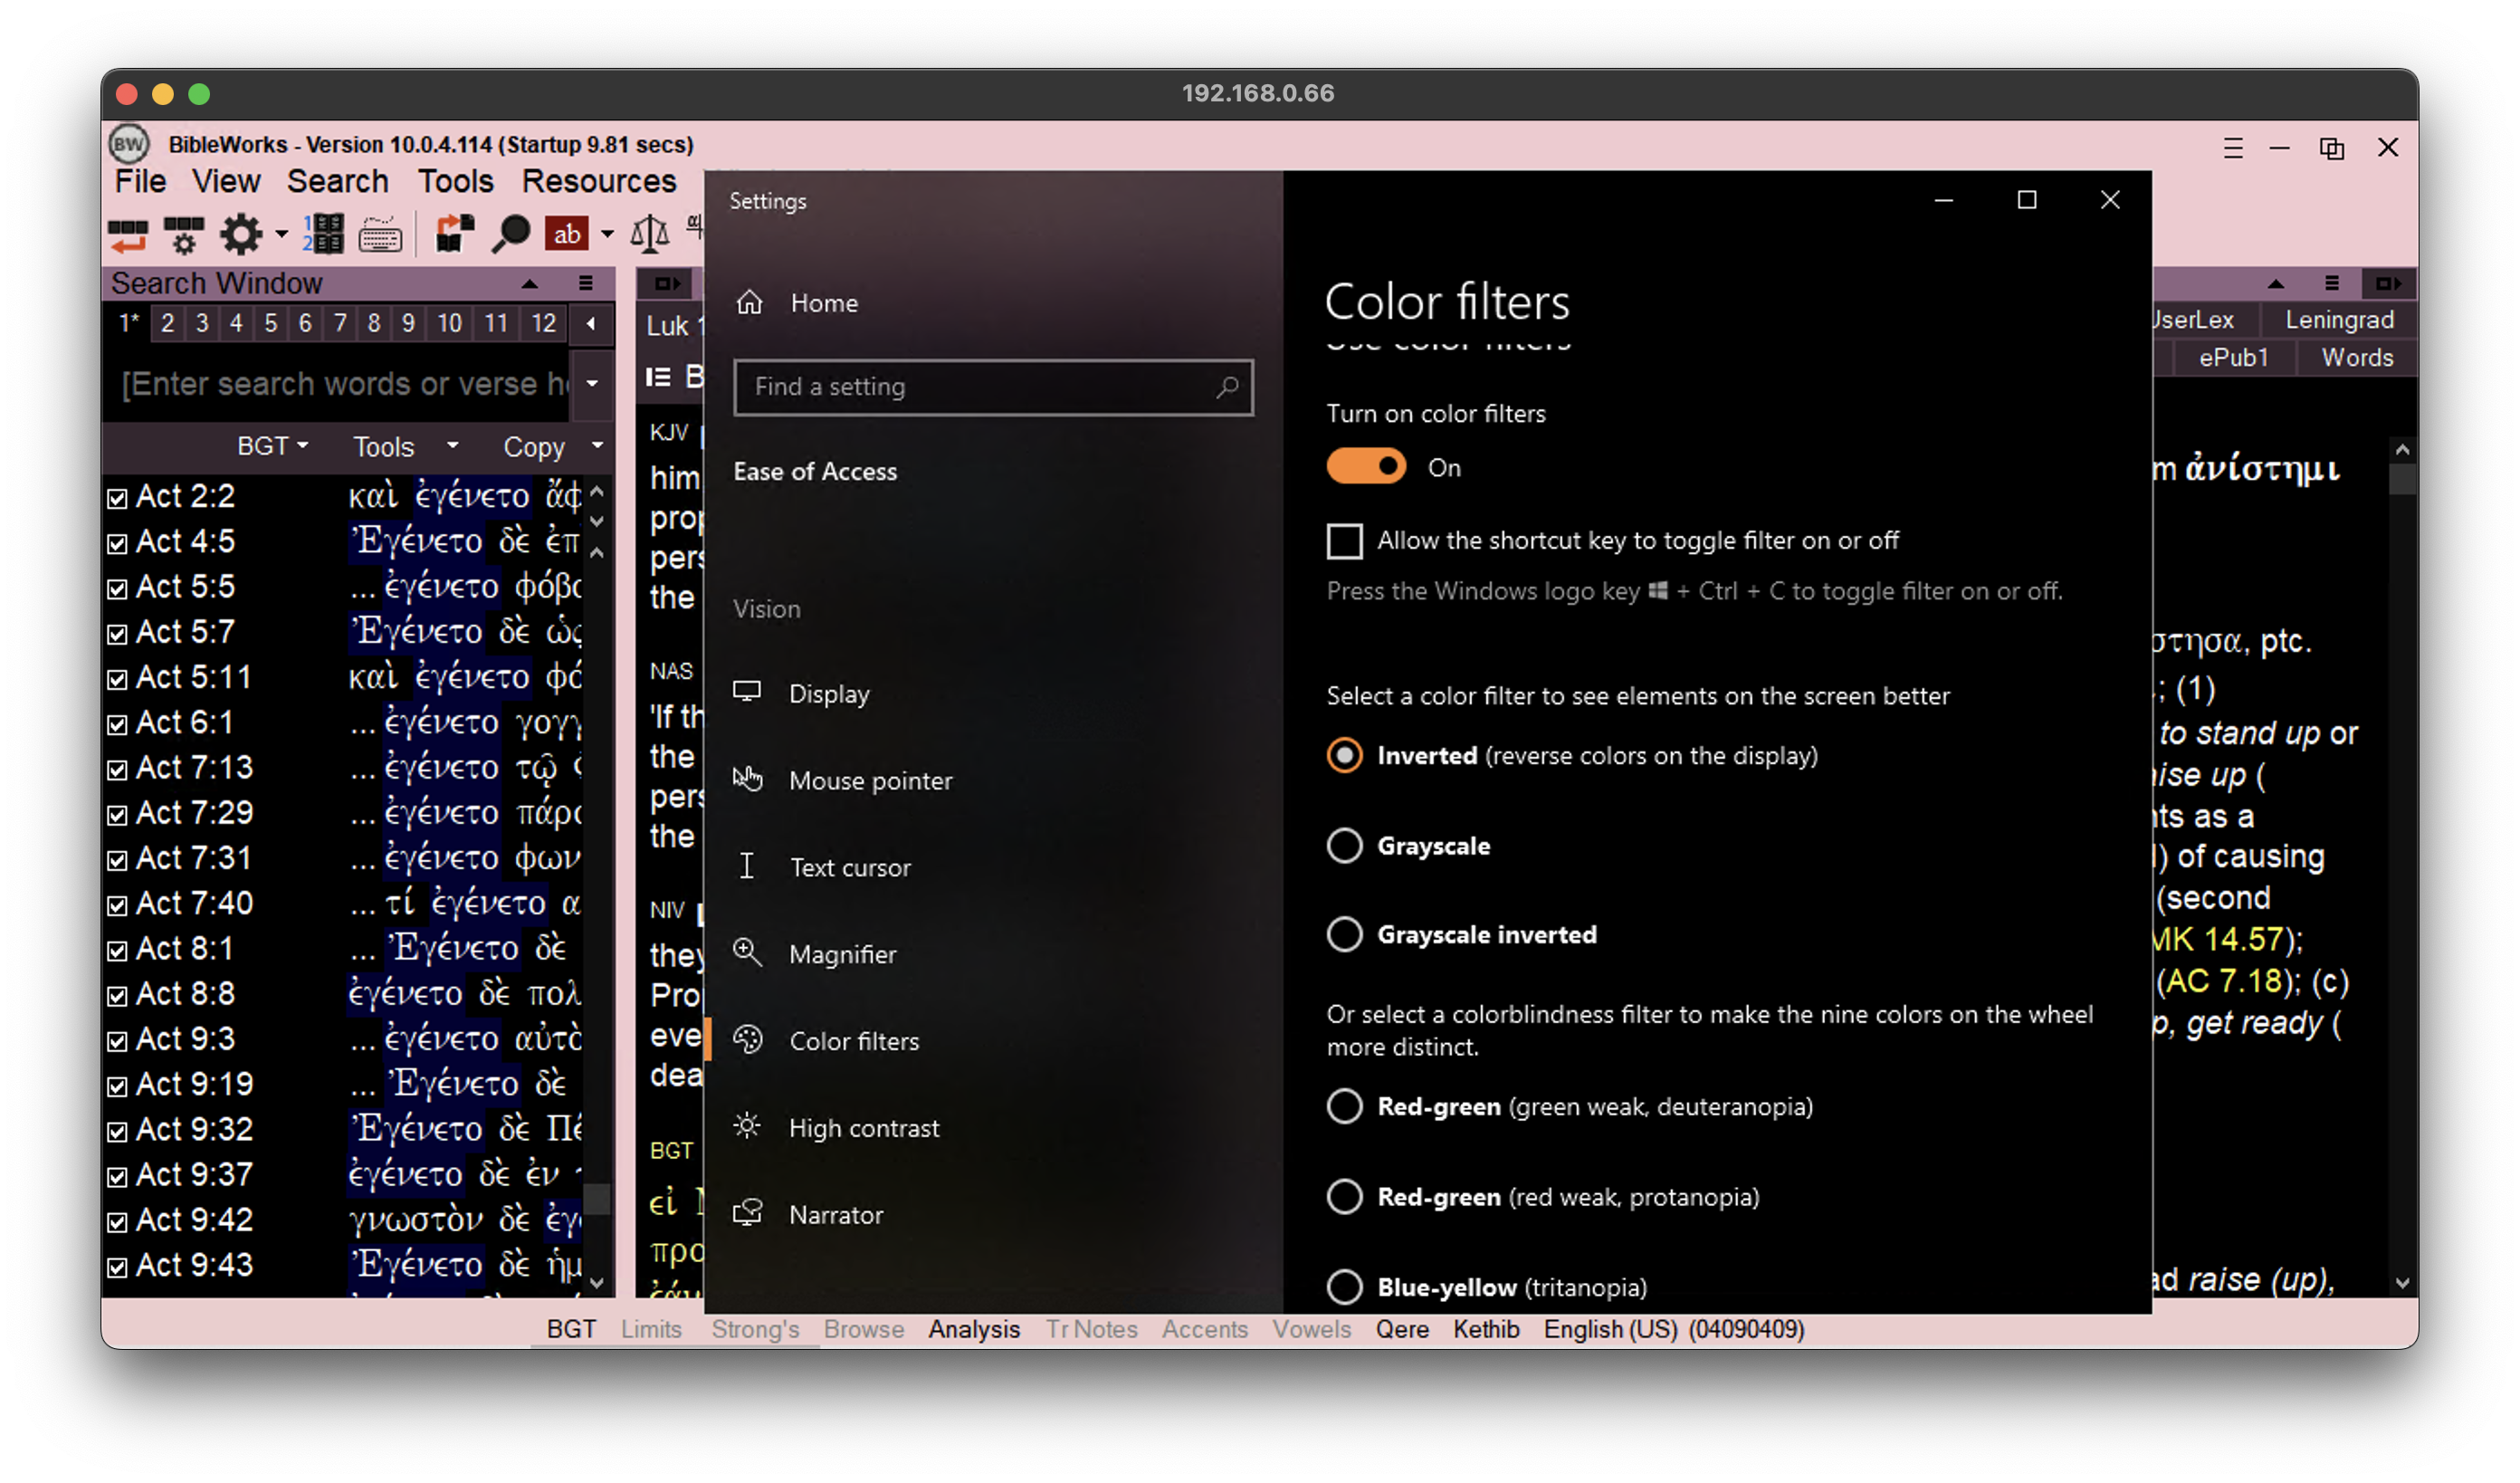
To "fake" a dark mode or tint the bright white, you can use many different 3rd party filters already available for Windows 10, such as f.lux. Or, you can use the built-in display filter in Windows 10 to invert the colours, it's found under "Settings" when you search for "Color filters". As a bonus, if you don't want any of chromatic aberrations (at all) using the "Greyscale inverted" option will mask all of this, and also give you faux-dark mode on BibleWorks 10. This is the option I now use, but the drawback is your interface won't have any colour anymore. Or maybe you do want the chromatic aberrations of ClearType! There are some who do and I'll never understand why.
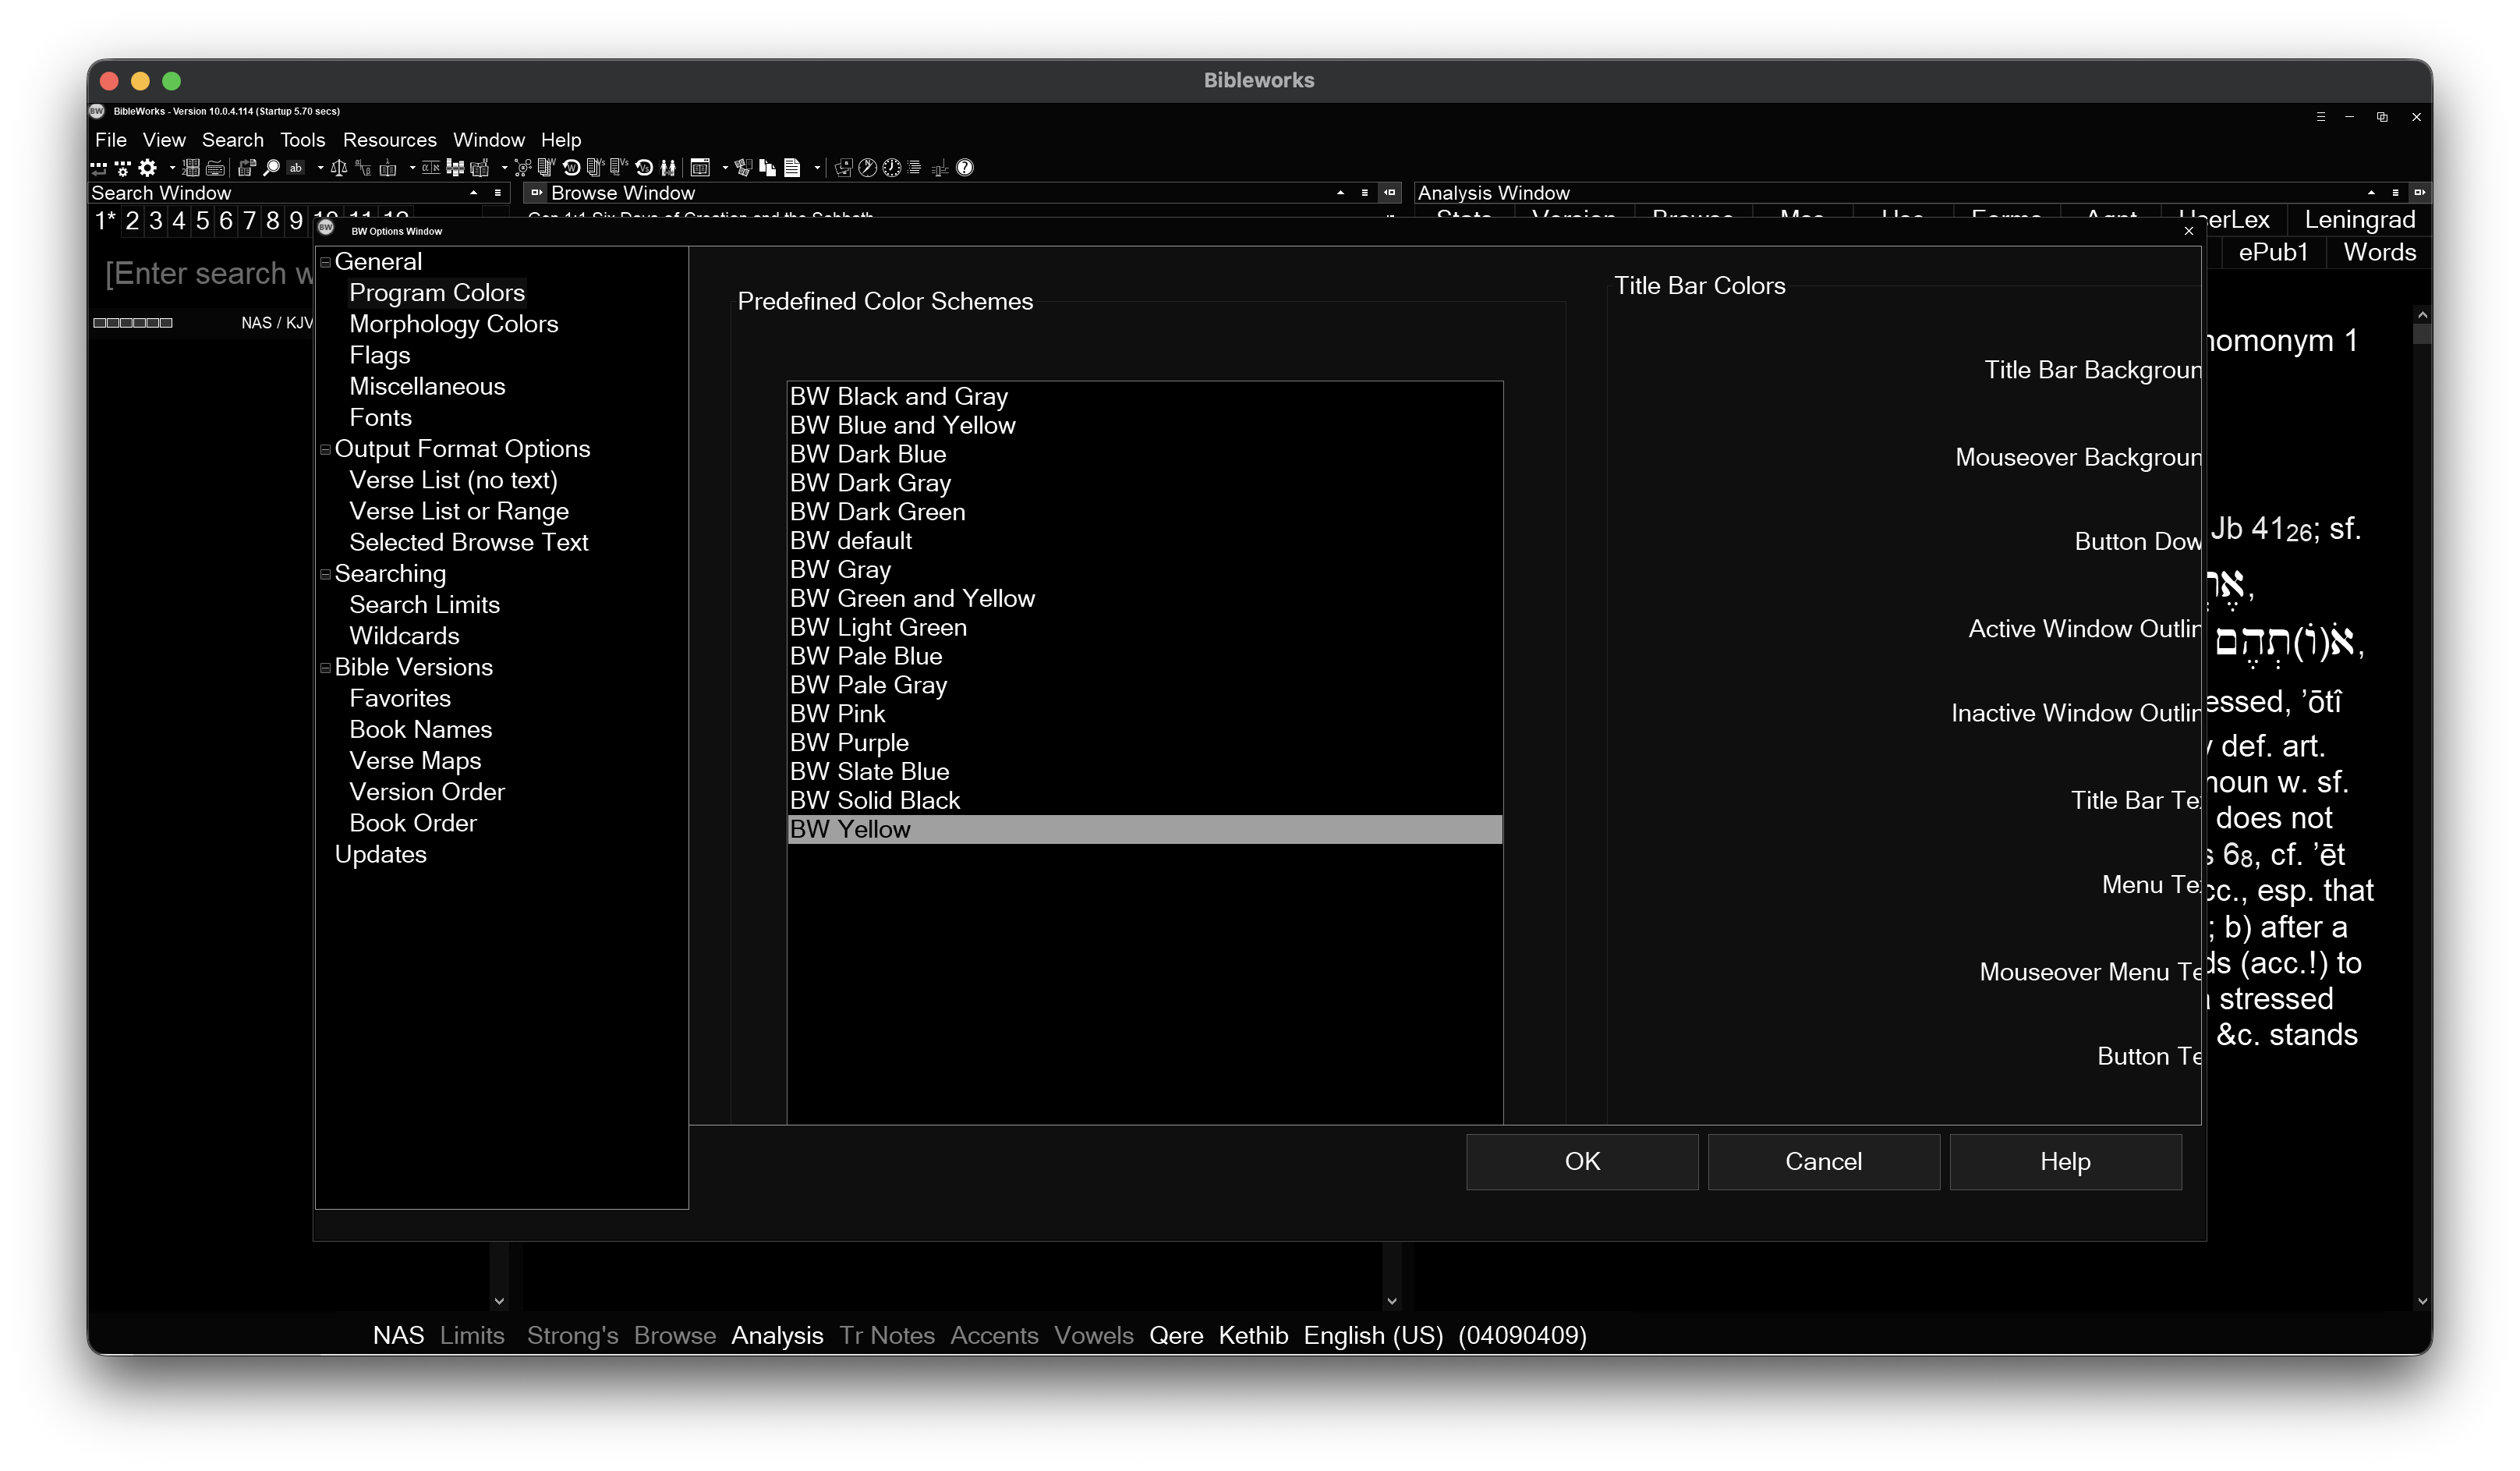
If you want the whole BibleWorks interface blacked out while using the inverted "Greyscale inverted", choose the "BW Yellow" scheme and the inversion will then make it completely black:
Blocking WAN Access (Windows Firewall)
If you want to isolate the Windows 10 from the internet (while obviously still retaining LAN access) the easiest method would be using "Windows Defender Firewall with Advanced Security" (It's silly that they 1) have two firewalls, 2) tacked 'Defender' in the name to make it even longer but I digress). We'll assume you're using the standard 192.168.0.x. If you don't know what subnets are or haven't set up your home network, you'll need to consult with the person who did.
- Allow Outbound LAN Traffic:
Under 'Outbound Rules' create a 'New Rule...'. Choose the "Custom" Rule Type. Leave the default option of "All programs". Leave the default option of "Any" for protocols. Under "Which remote IP addresses does this rule apply to? put 192.168.0.0/24. Leave the default option of "Allow the connection" on Action. Leave the default selection of all three rules selected on Profile. Finally name it anything you want, like LAN Outbound.
- Block Outbound WAN Traffic:
Under 'Outbound Rules' create a 'New Rule...'. Choose the "Custom" Rule Type. Leave the default option of "All programs". Leave the default option of "Any" for protocols. Under "Which remote IP addresses does this rule apply to? specify these two ranges:
0.0.0.0 - 192.167.255.255
192.168.1.0 - 223.255.255.255.
You will have to manually paste in the start and end for both. Under action choose "Block the connection". Leave the default selection of all three rules selected on Profile. Finally name it anything you want, like WAN Outbound Block.
The outbound rule blocks all ranges that aren't 192.168.0.x. It has to be done in this way as Windows 10 is finicky with how you define rules *while* still simultaneously connected over RDP. To test you should still be connected over the RDP session, and accessing any websites should result in no connection anymore.
BibleWorks 10 Autostart and Colour Filter Fix
There are still a few final things that can be done. If you want BibleWorks 10 to automatically start every time you log in/log onto the RDP session, run this registry key under the profile you'll be using:
Windows Registry Editor Version 5.00
[HKEY_CURRENT_USER\Software\Microsoft\Windows\CurrentVersion\Run]
"BibleWorks10"="C:\\Program Files (x86)\\BibleWorks 10\\BW1000.exe"
Next up, if you're using 1809 like I am there is a bug with the colour filter and RDP; such that every time the computer restarts and you RDP into it, the filter will be "enabled" but won't actually be active. Paste this into notepad, name it "toggle.ps1" and once again ensure "all files" is set so it doesn't just save as a txt. Save the file in C:\Scripts
Set-ItemProperty -Path "HKCU:\Software\Microsoft\ColorFiltering" -Name "Active" -Value 0
Start-Sleep -Milliseconds 500
Set-ItemProperty -Path "HKCU:\Software\Microsoft\ColorFiltering" -Name "Active" -Value 1
Then run this script in CMD to automatically create the Scheduled Task to run that PowerShell script that runs every time you log on:
schtasks /create ^
/tn "ToggleColorFilterAtLogon" ^
/tr "powershell.exe -NoProfile -WindowStyle Hidden -File \"C:\Scripts\toggle.ps1\"" ^
/sc onlogon ^
/rl limited
And then the colour filter problem should be resolved, and BibleWorks 10 will always automatically start if it wasn't already running after the machine reboots.
Power Settings
Sometimes Windows 10 can still shut itself off after a month for no reason; I got around this by ensuring Windows 10 LTSC 1809 never once connected to the internet after installing it (ensuring it doesn't phone home and start updating itself; it really shouldn't be the case but maybe an update changed something. Upon reviewing Event Viewer, there wasn't any other details other than Windows just decided to turn itself off). Since it's doing nothing other than BibleWorks anyways, having it never phone home and update itself ensures it stays less bloated.
After adjusting the power settings in Windows to disable sleep (which are designed completely sloppy and so annoying to go through), I was still getting "Event 41 (System): The system is entering sleep. Sleep Reason: System Idle". To bypass that you need to run these commands in CMD for standby, I also included hibernate for good measure:
powercfg -change -standby-timeout-ac 0
powercfg -change -standby-timeout-dc 0
powercfg -change -hibernate-timeout-ac 0
powercfg -change -hibernate-timeout-dc 0
This will ensure the settings (powercfg /query) change to:
Current AC Power Setting Index: 0x0000000
Current DC Power Setting Index: 0x0000000
Closing Thoughts
For me the RDP session works very well (using vanilla 1809 is the 'sweet spot' for Windows 10 not being as bloated but still having advanced RDP features prior versions lack) and gestures from the Magic Mouse are translated into BibleWorks just fine, bidirectional clipboard copies out unicode no problem. I find this is actually superior over running a pure Windows host, because when you minimise or maximise BibleWorks on Windows it suffers from a caching oversight in its code: rapidly flickering and flashing as it redraws the interface elements. Since minimising the RDP window on macOS isn't actually minimising BibleWorks inside Windows this is no longer an issue. This method is also able to future-proof the program as you can keep it running indefinitely on Windows 10 (no need for upgrading versions as the only thing the PC will be doing is running BibleWorks). It's nothing but a win/win/win, in my opinion. With the "true retina" modifications and monochrome colour inversion, I think it looks great. Of course, everyone's tastes vary.